Getting Started
Installation
Permissions
Widget & Inline Page
Classic - Distribution Engine Inline Page
Lightning - Distribution Engine Record Detail
Widget - Introduction
Adding Widget to a Lightning App
Adding Widget to a Lightning Page
Adding Widget to Salesforce Mobile
Adding Widget to a Classic Console
Adding Widget to Classic Homepage
Changing the Widget logout reason list
Distributor Test Tool (Legacy)
Before you Begin
Installation Overview
Whats in the Package
Triggers
Installation Process
Managed Package Licences
Page Layouts
Leaving A Review
Uninstall
Upgrading Distribution Engine
Configure Distribution Engine
Distribution Classifier
Territories
Territories Introduction
Create a Map
Import Territories
Territory Map Zoom Levels
Object Settings
Detecting Territories
Territory Settings
Territories - Technical Details
Territory Distributor
Lead Matching
Lead Matching - Introduction
Duplicate Rule Setup
Related Owner - Lead Matching
Lead matching vs lookup owner
Classifier Lead Matching Setup
Lead to Account/Contact/Lead Settings
Custom Classification
Custom Classification - Introduction
Stamp Groups
Stamps
Custom Classification - Synchronized Tag Collections
Lead Auto-Conversion
Lead Auto-Conversion - Introduction
Lead De-Duplication
Lead Conversion
Configuring Auto-Conversion
Auto-Conversion Rules
Distribution Classifier - Introduction
Backfill
Delay Filters
Distribution Teams
Distributors
Distribution Methods
Distribution Methods - Introduction
Lookup Owner
Load Balancing
Round Robin
Related Owner
Sticky Assignment
Distributors Introduction
Distributor Types
Standard Distributor Settings
Pull Distributor Settings
Trigger Distributor Settings
Manual Distributor Settings
Distributor Sources
Distributing from a Designated User
Distributor Filters
Distributor Team Member Filters
Distributor Sort Order
Advanced Filter Mode
Distributor Test Tool
Weighting and Caps
Distribution Hours
Tracking & SLAs
Team Settings
Distribution Teams Introduction
Distribution Assignment Process view
Team Summary
Team Members
Team Availability
Team Performance
Assignment Rejection
Post Assignment
Stamp Rejection
Dynamic Team Members
Distribution Tags
Distribution Availability
Distribution Availability
Shift Hours
Out of Office
Distribution Holidays
Holiday Regions
Regional Holidays
User Availability Toggle
Distribution Settings
Distribution Settings
Calendar Integration
Advanced Settings
Distribution Engine Running User
Licensed users list
Export & Import
Import Errors
Trigger Settings
Email Notifications
Email Notifications - Introduction
Custom Email Notifications
Disabling Standard Email Notifications
Customising the Email Template
Disabling Custom Email Notifications
From Email Address
Email Notification as Flow
Assignment Simulator
Assignment Simulator - Introduction
Configure Assignment Simulation
Assignment Simulator Result Explorer
Advanced
Q2Q teams
Integrating InsideSales.com power dialer
Pardot
Auto archive feature
Uploading tags via dataloader
Salesforce Mobile
Tuning Distribution Engine
Setup Introduction
Queue Basics
Queues
Distribution Sync
Monitoring
Distribution Console
Console Introduction
Application Monitoring
Today's Distributions
Sources Console
Availability Calendar
Distribution Logs
Distribution Logs
Distribution Logs List
Territories Logs List
Lead Matching Logs List
Custom Classification Log List
Auto-Conversion Logs List
Object Sync Logs List
Scheduler Logs List
Archive Logs List
Exporting Log Data
Distribution Analytics
Distribution Engine Details Object
Distribution Engine Dashboard
Salesforce Reports
Reports - Leads and Distribution Logs
Change History
Setup Examples
Rule-Based Routing
Skill Based Matching
Assigning Contacts - Pairing SDRs and AEs
Delaying Distribution
Enforce Cap for Manually Assigned Records
Criteria Caps
Splitting records between teams
Salesforce Admins
Workflow Rule Examples
Formula Examples
Domain Formula
Timezone Bucket Formula
Has Activity Formula
Territory Formula
Age Formula
Distribution Engine Details Formula
id Field to Text
Flow Examples
Chatter Notifications
Slack Notifications
Desktop or Mobile Notifications
Custom Assignment Rejection
Classify on Address Change
Assign on Action
Process Builder Examples
Process Builder - Avoiding Clashes
Opportunity Assignment - Updating Related Accounts & Contacts
Rejection API Process
Assign License and Permission Set on Team Member Addition
Assign License on Team Member Addition
Tasks on Record Assignment by Distribution Engine
Information for New Admins
Validation Rules
Developers
Apex API
Availability API
Classifier API
Out of Office API
Tags API
Team Members API
DE Apex API Introduction
Rejection API
System API
Trigger Distribution API
Apex Trigger Examples
Visualforce Examples
Troubleshooting
Warnings and Errors
Health Checker Messages
Scheduler Restarted
Distributor Failures - Records on Hold
Assignment Errors
Classifier Errors
Apex CPU time limit exceeded
Timeout when deleting a Team Member or Distributor
Records Stuck / Not Being Assigned
Support
Previous Releases
2.9
3
4
4.12
4.15
Armadillo
Bison
Chameleon
Dragon
Dragon beta release - install guide
Eagle upgrade process
Eagle
Fox
Gorilla
Gorilla Upgrade Process
Hummingbird
Hummingbird Upgrade Process
Impala
Impala Upgrade Process
Jellyfish
Jellyfish Upgrade Process
Koala
Koala Upgrade Process
Llama
Llama Upgrade Process
Meerkat
Meerkat Upgrade Process
Upgrade Links
Introducing Nightingale!
Nightingale Release Notes
Nightingale Upgrade Process
Owl Release Notes
Owl Upgrade Process
Frequently Asked Questions
Legacy Widget - New status
Distribution Engine Aborted
Alerts not Firing
Distribution Engine Delayed
Can one Distributor Assign from Multiple Queues / Users?
Can't See Distribution Engine
Distribution Engine Not Running
Manual Shutdown of Distribution Engine
Exclude members from Holidays
Distribution Engine Health Checker Restart
Dashboard Running User Error
Assignments going to wrong user
Contact Support
Grant Login Access
Purchase
Purchasing Steps
Distribution Engine - Purchasing FAQ
Support Packages
Legal Agreement Details
GDPR
Policies
Migrating Licences
Contact us
What Tier am I on?
Features by Tier
Booking Engine - Purchasing FAQ
Latest Release
Booking Engine
Installing Booking Engine
Booking Engine Quick Start
Booking Engine - Remote Site Settings
Adding the Booking component to a record page
Booking - Permission Sets
Configuring Booking Engine
Booking Settings
Booking Types
Working Hours
Booking Type Hosts
Booking Type Settings
Guest Cancel & Reschedule Bookings
Booking Engine - External Services
Reminders
Booking Filters
All Bookings
User Settings
Latest Release
Making Bookings
Booking Engine Overview
- All Categories
- Installation
- Widget & Inline Page
- Adding Widget to a Classic Console
Adding Widget to a Classic Console
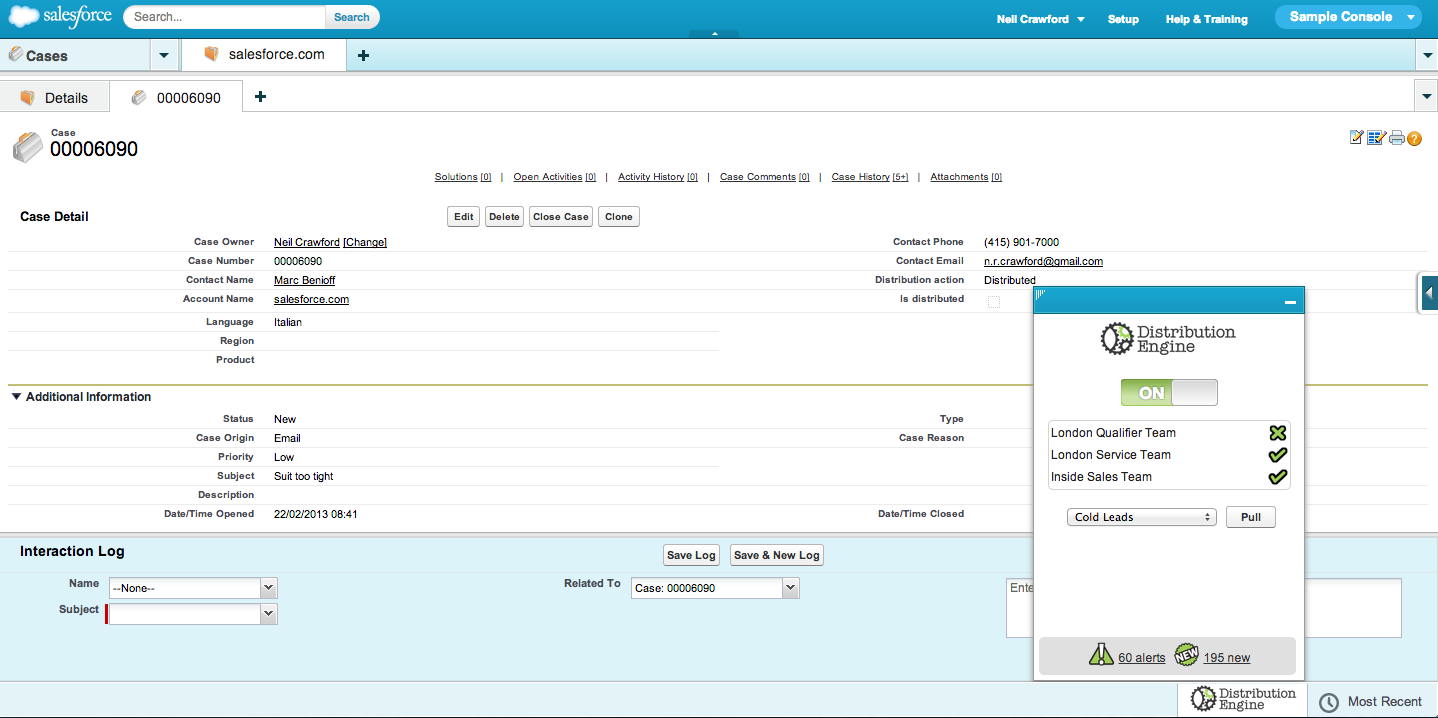
If you are using the Sales or Service Cloud Console you can use the Distribution Engine Widget in the console. This enables agents to toggle their availability, view their current status within teams and use pull distributors to request extra work.

Creating a custom console component
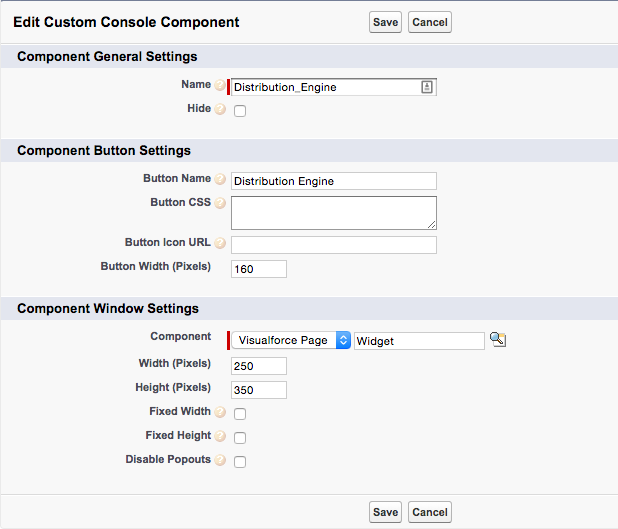
1. Create the Custom Console Component by going to Setup > Customize > Custom Console Components and clicking New
Enter the following fields. Leave all other fields blank.
Component General Settings
- Name - enter Distribution_Engine for the component name
Component Button Settings
- Button Name - enter Distribution Engine for the component label. Note this will be overwritten with the Distribution Engine logo when the component loads.
- Button width - this should be 160
Component Window Settings
- Component - select the Widget page.
- Width - the width of the widget once opened. We recommend 250.
- Height - the height of the widget once opened. We recommend 350.

Making the custom console component visible
Modify your Service Cloud Console App to include the new Service Cloud Custom Console Component. Setup > Create > Apps and Edit the relevant App.
In the Choose Console Components Section select Distribution_Engine from the Available list and hit Save.

